


In computer programming, create, read, update, and delete (CRUD) are the four basic operations of persistent storage. CRUD is sometimes used to describe user interface conventions that facilitate viewing, searching, and changing information using computer-based forms and reports.
To READ or Fetching data from the internet is necessary for most apps. Luckily, Dart and Flutter provide tools, such as the http package, for this type of work. In this tutorial, I will be taking you through how to perform these operations in Flutter. This process uses the following steps: 1.Add the http package. 2.Make a network request using the http package. 3.Convert the response into a custom Dart object. 4.Fetch and 5.Display the data with Flutter.
1. Add the http package
The http package provides the simplest way to fetch data from the internet. To install the http package, add it to the dependencies section of the pubspec.yaml file. You can find the latest version of the http package the pub.dev.
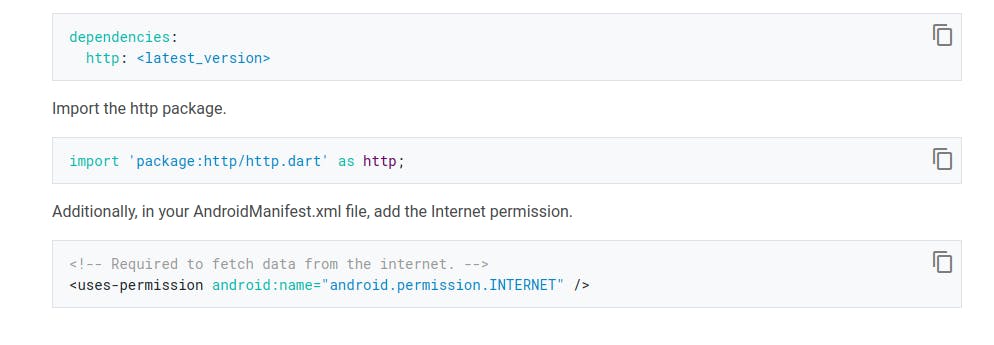
The image above shows how to add files to the pubspec.yaml file and also how to import the http package. The third step in the image is showing how to add internet permission to your app.
The line of code should be added to the AndroidManifest.xml file found in the Android/app/src/main. This is all with step one.
2. Make a network request
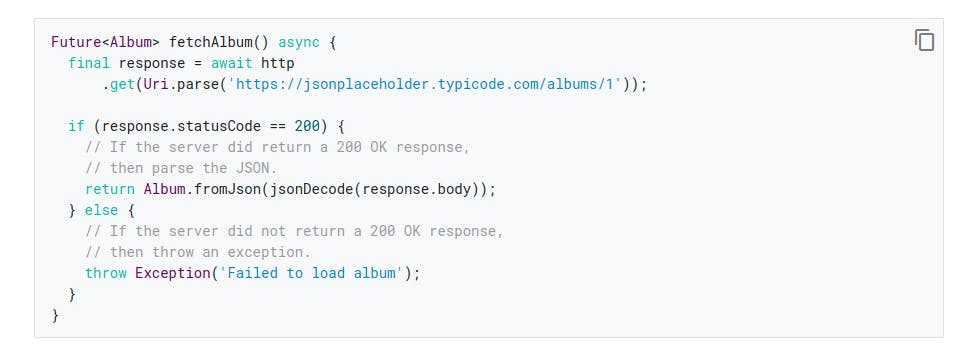
Using an album sample from the API from the JSONPlaceholder, we will request to read the context of the album using the http.get() method.
      Future<http.Response> fetchAlbum() {
           return http.get(Uri.parse('https://jsonplaceholder.typicode.com/albums/1'));
                 }
The http.get() method returns a Future that contains a Response.
--Future is a core Dart class for working with async operations. A Future object represents a potential value or error that will be available at some time in the future.
--The http.Response class contains the data received from a successful http call.
3. Convert the response into a custom Dart object
While it’s easy to make a network request, working with a raw Future is not going to be easy, for convenience it is better to convert the raw files into JSON. To make your life easier, convert the http.Response into a Dart object.
Create an Album class
First, create an Album class that contains the data from the network request. It includes a factory constructor that creates an Album from JSON. This is an example of how the class should look like class Album { final int userId; final int id; final String title; Album({ required this.userId, required this.id, required this.title, }); factory Album.fromJson(Map json) { return Album( userId: json['userId'], id: json['id'], title: json['title'], ); } }
Convert the http.Response to an Album
Now, use the following steps to update the fetchAlbum() function to return a Future:
  1.Convert the response body into a JSON Map with the dart:convert package.
  2.If the server does return an OK response with a status code of 200, then convert the JSON Map into an Album using the fromJson() factory method.
  3.If the server does not return an OK response with a status code of 200, then throw an exception. (Even in the case of a “404 Not Found” server response, throw an exception. Do not return null. This is important when examining the data in snapshot, as shown below.)
Once again using the flutter Future keyword specifying the object 'album' and creating an async function we can and will be able to get our data from the request call and then convert after the 'if' condition is passed which is to test the status of our call if the status shows success which is what the 'if (statusCode ==200) means then we can convert from JSON to dart object. If the condition is not true then it will throw an exception (an error message).
4. Fetch the data
Call the fetchAlbum() method in either the initState()
  class _MyAppState extends State<MyApp> {
      late Future<Album> futureAlbum; @override void initState() {
      super.initState();
      futureAlbum = fetchAlbum(); } // ···
    }
5. Display the data
To display the data on the screen, use the FutureBuilder widget. The FutureBuilder widget comes with Flutter and makes it easy to work with asynchronous data sources.
You must provide two parameters 1.The Future you want to work with. In this case, the future returned from the fetchAlbum() function. 2.A builder function that tells Flutter what to render, depending on the state of the Future: loading, success, or error.
     FutureBuilder<Album>(
          future: futureAlbum,
        builder: (context, snapshot) {
          if (snapshot.hasData) {
               return Text(snapshot.data!.title);
            } else if (snapshot.hasError) {
               return Text('${snapshot.error}');
          }
        // By default, show a loading spinner.
       return const CircularProgressIndicator();
        },
     )
Hurray!!! You have been able to successfully read live data from the internet into your Flutter app.
Congratulations, if you would like to discuss this or any related issue Chat Me.
Follow me on Twitter for More...